
Let's get down into the step by step nitty gritty of how to setup your HubSpot membership site. This is the first part of a 3 part series of how to create your HubSpot integrated members only area of your Wordpress site. To see the overview of the steps we're going to take in all 3 parts of the series,
click here.
This first part gives you the step by step instructions for the following stages of setup:
- Get your Inbound Member Add-on here. (we'll assume you've already selected your plan and signed up for your subscription)
- Install the add-on to your WordPress Plugins
- Activate your Inbound Member licence (which is sent to you when you buy your Add-on)
- Connect HubSpot
Let's get right to it shall we?
Step 1 - Get your Inbound Member Add-on
We'll assume you've already downloaded your Add-on but just in case you haven't, you need to click here and select your plan (single site monthly or yearly, or multisite monthly subscription). Then process your payment and we'll email you your add-on .zip file for the next step, and your Licence key for activation in the following step.
Step 2 - Install the add-on to your Wordpress Plugins
You can install your add-on either automatically through the Wordpress dashboard installation process, or manually via FTP. We'll start with Automatic Installation.
Automatic Installation
To add Inbound Member using the Wordpress built-in plugin installer:
- Download the inboundmember.zip file from the email we sent you to your desktop.
- In your Wordpress Dashboard, go to Plugins > Add New.
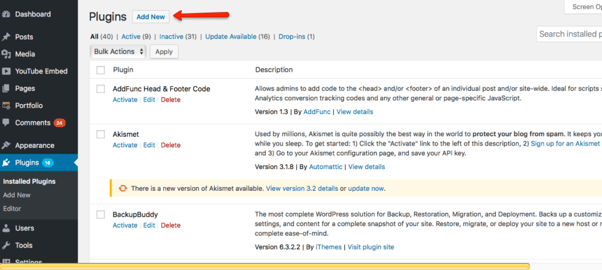
- Click Upload Plugin (next to the Add Plugins page title).

- Click Choose File.
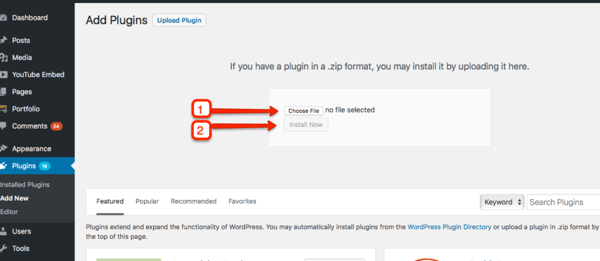
- Select the inboundmember.zip file that was emailed to you when you purchased.
- Click Install Now to install Inbound Member.
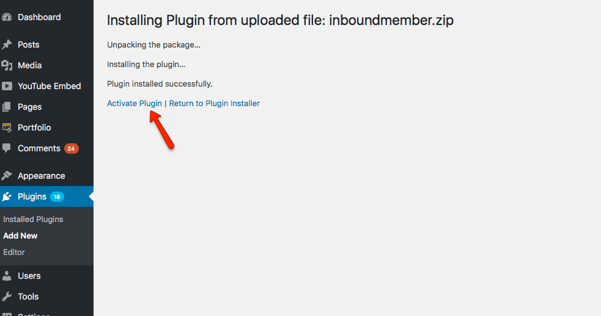
- The resulting installation screen will list the installation as successful or note any problems during the install.
- If successful, click Activate Plugin to activate it, or Return to Plugin Installer and contact us with a note of the issue listed in the installation process to help you resolve any issues.
Manual Installation
To install Inbound Member Plugin manually:
- Download the inboundmember.zip file to your desktop.
- If downloaded as a zip archive, extract the Plugin folder to your desktop.
- With your FTP program, upload the Plugin folder to the wp-content/plugins folder in your WordPress directory online.
- Go to Plugins screen and find the newly uploaded Plugin in the list.
- Click Activate Plugin to activate it.
Step 3 - Activate your Inbound Member licence
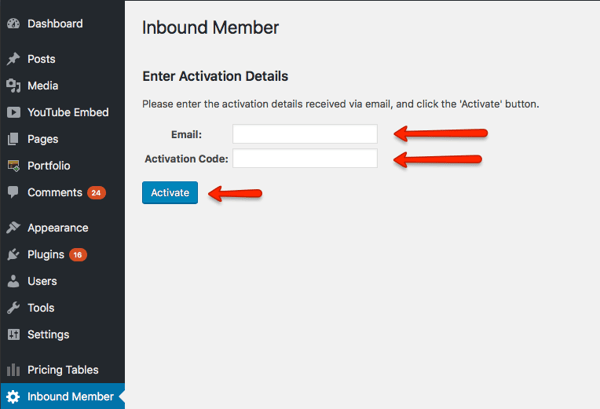
- Once you have activated your plugin, you will see a new item on your Wordpress dashboard menu called "Inbound Member".

- Click on the Inbound Member menu item and enter the email and licence key that were emailed to you when you purchased Inbound Member.
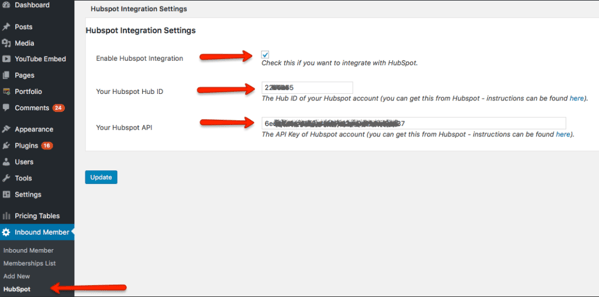
Step 4 - Connect HubSpot
- Once your Inbound Member licence is activated you'll see three more sub-menu items under the Inbound Member main menu item. Select HubSpot and check the box to Enable HubSpot Integration. Then enter your HubID and API Key. If you're not sure where to find these, there are helpful links just under the field entry boxes to show you where to get them. Make sure you click Update to save your settings.
-
Check that your new Contact Property Group and two new Contact Properties have been created.To do this, log in to HubSpot and select Contact Settings. Check that there is a new group called Inbound Member and two contact properties called IM Password and Last Login date. If these don't appear. contact us at support@inboundaddons.com and do not progress further with your installation.
That's it for Part 1 of the setup of your HubSpot membership site. In Part 2, we're going to create the special pages for your members to land on after login, and non member redirect pages if they don't have access, as well as create your membership levels and grant member level access to member only pages.
.png?width=100&height=100&name=Samantha%20Alford%20(PNG).png)