

In Part 1 of this How to setup your HubSpot Membership Site series we went step by step through the process of installing Inbound Member and connecting it to HubSpot. Now in Part 2 we're going to create the special pages for your members to land on after login. Then we'll set up non-member redirect pages for people who don't have access, as well as create your membership levels and grant member level access to member only pages.
So let's get right to it!
Step 5 - Create member "redirect after login" page.
This page is where your members will redirect to after they successfully log in to your membership site. We're going to create one page here, but you can create different pages for each membership level if you wish.
Note that another alternative to having different pages for each membership level is to use our "im_inlist" shortcode which will be covered in Part 3. This shortcode lets you display different content on any page depending on which lists your contacts are a member of in HubSpot. We recommend this method as it is considerably less overhead than managing pages for different memership levels.
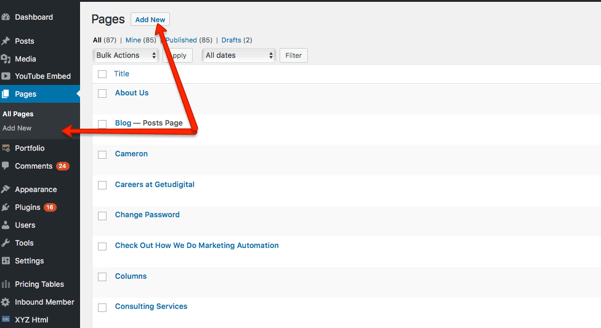
- Create a new page in Wordpress. You can name it anything you like. We've used "Welcome to xyz Membership Area" and other similar titles in the past.
- You may choose to add restricted membership content on this page now, or do it later.
- If you scroll down the page you'll see a section called "Inbound Member Page Access". This is where we manage which membership level has access to this page. At this stage, don't add the Inbound Member Page Access options yet. We'll do that once we've set up the membership levels.
- Publish your page.
- Copy the page URL to your clipboard or somewhere else for future reference as you'll need this for setting up the membership levels.
Step 6 - Create a page for non-members to redirect to when they don't have access
- As in Step 5 above, create a page in wordpress for members who don't have access to either all levels or a specific membership level. You will use this in setting up your membership levels. This page can also be your opportunity to either sell your membership package or upsell to higher tiers.
- You can put some placeholder content on here for now or add your upsell content now - it's up to you.
- Don't enter the Inbound Member Page Access details just yet, you'll do this later.
- Publish your page.
- Copy the URL to your clipboard or somewhere else for later use in setting up the membership levels.
Step 7 - Add New membership level(s)
- Create a HubSpot Static List that represents your Membership Level. We recommend you have one membership level and distinguish content on pages (eg. for Silver, Gold, Platinum members) by HubSpot list membership using the "im_inlist" shortcode (discussed in Part 3). However if you prefer, you can set up multiple membership levels.
- Select 'Add New' from the Inbound Member menu items on your Wordpress dashboard and complete each section. Details of each input are below.
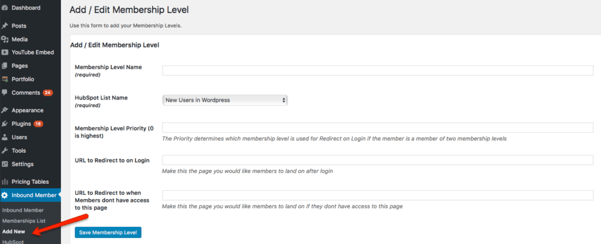
- Membership Level Name: this is an internal name for your membership level (eg. Gold Members) and is not seen by your members. We recommend you have one membership level and distinguish content on pages by HubSpot list membership using the "im_inlist" shortcode (discussed in Part 3). You can change your Membership Level Name later, however ideally you will name it the same as your HubSpot list name for consistency.
- HubSpot List name: Select the name of the Static HubSpot list you just created. If it doesn't appear in the drop down list, you may need to refresh your page to update the lists in Wordpress with the list you just created.
- Membership Level Priority: The default for this field is 0 (zero). This field is used to determine which redirect URLs to go to if you have multiple membership levels and members are likely to be in two or more at any one time. Zero is the highest priority. eg. If you have a member in both Gold and Platinum membership levels and you want them to redirect to the Platinum login redirect page, make Platinum 0 and Gold 1 Priority.
- URL to redirect to on login: this is the URL of the page you created earlier.
- URL to redirect to when members don't have access to this page: this is the URL of the page you created earlier.
- Click "Save Membership Level".
- To view your membership levels select "Membership List" from the Inbound Member menu items.
- To edit the membership level at any time, select Edit from the "Membership List" menu item.
- To delete a membership level, select Delete from the "Membership List" menu item.
Step 8 - Grant Member Level Access to member only page(s)
- Return to the page that you created to redirect members to once they have logged in.
- Towards the bottom of the page you'll see a section titled "Inbound Member Page Access".
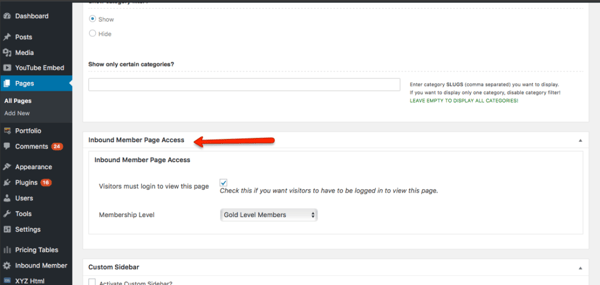
- Check the box to ensure that Visitors must be logged in to view this page.
- Select the applicable membership level from the drop down box.
- For universal membership pages such as Change Password, you may wish to select "Allow to all logged in Users" to avoid the need for creating multiple Change Password pages for each membership level.
- Update your page to apply the membership level restricted access.
That's it for Part 2 of the setup of your HubSpot membership site. In Part 3, we're going to: create your HubSpot workflow to automatically create members and send their credentials; add your login and change password pages; add a logout link; and add shortcodes to manage visible content based on contact list membership in HubSpot.
.png?width=100&height=100&name=Samantha%20Alford%20(PNG).png)